Two-Factor Authentication (2FA) Setup Guide for GoVIEW
This section will outline the how to setup two-factor authentication (2FA) for eCore students.
This section will provide information on the following:
- Introduction to Two-Factor Authentication (2FA)
- What You'll Need
- Setting Up Two-Factor Authentication
- Resetting or Changing Your 2FA Setup
- Support Contacts
- FAQ
- Troubleshooting
- Security Best Practices
- Authenticator Instructions
Introduction to Two-Factor Authentication (2FA)
Two-Factor Authentication (2FA) adds an extra layer of security to your GoVIEW account by requiring a second form of verification. This guide will help you set up 2FA on GoVIEW using a supported authenticator app, such as:
You may use any TOTP-compatible app, including one you already use for your home institution accounts.
Additionally, D2L has added email support for 2FA. This will allow you to receive 2FA codes via you registered email address. Instructions for setting this up are also included below. Please note that it is possible to have an authenticator app and email 2FA enabled simultaneously. Setting up both methods gives greater flexibility and provides a backup method if one method is not available.
What You'll Need
Before starting, ensure you have:
2FA by Email
- An active GoVIEW Account.
- A stable internet connection.
- Access to the email address associated with your GoVIEW account.
2FA by Authentication App
- An active GoVIEW Account.
- A stable internet connection.
- Two Devices
- A smartphone or tablet with an authenticator app installed (e.g., DUO Mobile, Google Authenticator, Microsoft Authenticator).
- A second device, such as a desktop computer or laptop, to access your GoVIEW account during the setup process.
Setting Up Two-Factor Authentication
Setting up Email-based Two-Factor Authentication (2FA)
Email-based 2FA is now available for GoVIEW. The instructions below describe how to set email 2FA up upon login or through your account settings after logging in. Please note that it is possible to have an authenticator app and email 2FA set up simultaneously. Setting up both methods gives greater flexibility and provides a backup if one method is not available.
Setting up Email-based 2FA upon Login
-
When prompted to set up 2FA, select the Email Authentication tab, and then Select Send Code to Email.

-
Retrieve the code from your email and enter it in the Code field. Select Check Code. If you receive a green check and message indicating the code was entered correctly, select Enable Authenticator.

Setting up Email-based 2FA via Account Settings
-
Select your name in the top right of the screen and select Account Settings.

-
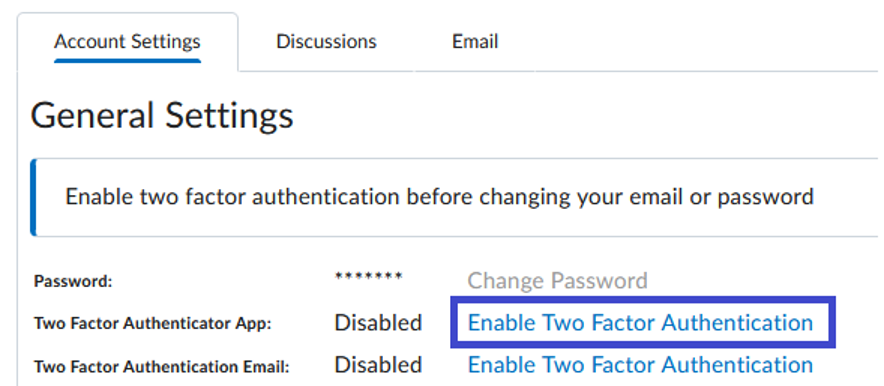
You should see the option for Two Factor Authentication Email. Select Enable Two Factor Authentication.

-
In the pop-up window, confirm your correct email address is listed and select Send Code to Email. Enter the code in the Code field and select Check Code. If you see a green
check mark and message indicating it was correctly entered, select Enable Authenticator.
- You should now see a confirmation message indicating Email-based 2FA has been successfully set up.
App-based Two-Factor Authentication (2FA)
First-Time Setup (Upon Login)
- When you log into GoVIEW for the first time, you will be prompted to set up Two-Factor Authentication. Select the Authenticator App tab. A window will appear with a QR code.

- Open your authentication app and select "Add account" or "Scan QR code."
- Scan the QR code displayed on GoVIEW.
- Enter the 6-digit verification code generated by the app into GoVIEW.
- Confirm back up of personal code displayed below QR code.
- Click "Enable Authenticator" to complete the setup.

Note: You may skip the setup up to 5 times, but it will become mandatory after the fifth login attempt.
Setting Up 2FA via Account Settings
To set up 2FA later, follow these steps:
- Log into GoVIEW.
- Select your name in the top right of the screen and select Account Settings.

- You should see the option for the Two-Factor Authentication app. Select Enable Two-Factor Authentication.
- A pop-up window will appear with a QR code. Open your authentication app and Select "Add account" or "Scan QR code." Scan the QR code displayed on GoVIEW and enter the 6-digit verification code generated by the app into GoVIEW.
- Confirm back up of personal code displayed below QR code.
- Click "Enable Authenticator" to complete the setup.

Logging into GoVIEW Using Email-based 2FA
When prompted for 2FA upon login, select the button to Send Code to Email. Retrieve the code from your email, enter it in the Verification Code field, and then select Login.

Resetting or Changing Your 2FA Setup
If You Still Have Access to Your Original Device:
- Log into GoVIEW using your username, password, and authentication code.
- Go to "Account Settings."
- Find "Two-Factor Authentication" and select "Disable 2FA."
- Follow the setup instructions again using your new device.
If You Lost Access to Your 2FA App or Device:
- You will need to contact support to reset your 2FA setup.
- Once reset, log in and follow the initial setup steps to reconfigure 2FA.
Support Contacts
Course login or registration help
- Business hours
- Monday – Thursday: 8:00 AM – 8:00 PM
- Friday: 8:00 AM – 5:00 PM
After-hours technical support
For support outside business hours, contact the D2L Help Center:
- D2Lhelp.view.usg.edu
- Toll-free: 1-855-772-0423
FAQ
You'll need to set up 2FA on the new device. Log into GoVIEW, disable 2FA in Account Settings, and follow the setup instructions again.
Contact the USG eCampus Helpdesk or D2L Helpdesk to reset your 2FA.
Yes! Any Dual Factor Authentication app will work.
Some commonly used authentication apps include DUO Mobile, Google Authenticator, and Microsoft Authenticator.
Contact the USG eCampus Helpdesk or D2L Helpdesk to reset your 2FA.
Troubleshooting
- QR Code Issues:
- If the QR code doesn't scan, manually enter the secret key provided by GoVIEW into your authentication app.
- Time Synchronization:
- Ensure your device's time is synced automatically, as 2FA codes are time-sensitive.
Security Best Practices
- Use a Strong Password for GoVIEW to log into your account:
- Ensure your password is unique and strong.
-
Avoid Sharing Codes:
- Never share your authentication codes or backup keys with others.
-
Multi-Device Setup:
- Consider setting up 2FA on multiple devices (e.g., phone and tablet) to avoid disruptions if one device becomes inaccessible.